Sautéed Chanterelles with Bacon and Cream

It really is not the chanterelle season yet here in the Pacific Northwest, so it was a bit of a surprise to see them at Costco last week. One pound for $8.99 was too hard to pass up. Even if eating light and local is what’s called for in the warm days of summer, chanterelles and smoked bacon together are hard to beat any time of year.
Sautéed Chanterelles with Bacon and Cream
1 lb. chanterelle mushrooms
4 slices thick-cut smoked bacon, sliced crosswise into ¼” pieces
3 tbsp. half-and-half or heavy cream
1 tbsp. sour cream
2 tbsp. minced flat-leaf parsley
1 tsp. lemon juice
Combine creams and set aside.
Rinse mushrooms under cool water to rid them of debris and pat them dry with kitchen towel. Shred larger mushrooms into smaller pieces, starting at the cap end and tearing along the stem with no piece wider than ½ inch. Leave small mushrooms intact.
Fry bacon in 12″ skillet over medium heat until crisp. With slotted spoon, remove bacon to a dish. In the rendered bacon fat, sauté mushrooms sprinkled with salt and pepper to taste, stirring occasionally, until most of their released liquid evaporates and the mushrooms begin to sizzle, about 10-15 minutes (depending on the their moisture content).
Add cream mixture, stir, and cook for 2-3 minutes until thickened slightly. Off heat, stir in reserved bacon and lemon juice. Remove mushrooms to serving dish and sprinkle with parsley.
Chicken Wings in Black Bean Sauce

I love the funky savoriness of Chinese fermented black beans (douchi). I also love chicken wings. No big surprise then that I love them together. Rather than packaged, loose black beans (which need to be swirled in water and drained several times), for convenience I use the Master brand of fermented black beans bottled in oil. I find other prepared black bean sauces sometimes too salty and add other ingredients, including garlic, whose portions I’d rather control myself.
Chicken Wings in Black Bean Sauce
Serves 2-3
2 tbsp. vegetable oil
3 tbsp. fermented black bean sauce, drained of excess oil
2⁄3 c. minced green onion, divided
1 tbsp. minced garlic
2 tbsp. minced ginger
2 lb. chicken wings, cut into 2 pieces, tips discarded, fat trimmed
2⁄3 c. low-sodium chicken broth
1 tbsp. sugar 
1 tbsp. soy sauce
4 small seeded and minced chili pepper (optional)
1⁄4 c. dry sherry
1⁄4 c. minced cilantro
Heat wok over high heat until very hot, then add oil. Add black beans, 1⁄3 cup of the green onions, ginger, and garlic and stir-fry mixture for 30 seconds.
Add chicken wings and stir-fry mixture for 2 minutes.
Stir in broth, soy sauce, sugar, sherry, and chili peppers (if using), bring liquid to boil, and simmer mixture, covered, stirring occasionally, for 30 minutes.
Preheat oven to 400°F. Reduce liquid in wok, uncovered, over medium heat, stirring occasionally, until sauce is reduced (about 1⁄4 cup) and starts to sizzle but not scorch, about 10-15 minutes more. Remove pan from heat. Toss wings in reduced sauce until coated.
Transfer wings to cookie sheet, lined with aluminum foil and fitted wire rack, and bake wings until golden brown, about 10 minutes.
Transfer wings to platter and sprinkle them with remaining 1⁄3 cup green onions and cilantro.
Sautéed Watercress with Fermented Black Beans and XO Sauce

I’ve made this watercress dish over the years using only XO sauce, but recently, when there was only a teaspoon of XO left in the jar, and two bunches of watercress to cook, I had to come up with some substitutions, or rather additions. I had oyster sauce and fermented black bean sauce on hand. The result turned out tastier than the original recipe. An added benefit is that not much XO sauce is needed, important because it’s so expensive. The watercress I use is the kind I can get (nasturtium officinale) at Uwajimaya, an Asian supermarket in the Seattle area, instead of what seems more commonly available elsewhere with the broad pond-lily leaves and thin stems.

The important step is to cook away almost all the water during the cooking process, otherwise the sauce will become diluted.

Sautéed Watercress with Fermented Black Beans and XO Sauce
2 bunches watercress
2 tbsp. canola oil or light olive oil
1 tsp. XO sauce
1 tsp. oyster sauce
1 tbsp. fermented black bean sauce (such as Master brand)
Rinse watercress thoroughly and spin-dry. Pinch off smaller stems from thick ones, leaving smaller stems attached to leaves.
Combine sauces and black beans.
Heat oil over medium heat in 10″ nonstick skillet until shimmering, add watercress, stirring occasionally until watercress cooks down and is almost dry, about 10 minutes. Add sauce mixture, stirring occasionally to thoroughly incorporate sauce (most easily done with long cooking chopsticks), about 5 minutes longer, until additional liquid evaporates. The volume of watercress will be reduced greatly. Serve.
Roasted Peppers with Italian Sausage

Roasted Peppers with Italian Sausage
- 3 lbs corno di toro or red bell peppers, rinsed and patted dry
- 2 tbsp olive oil
- 2 whole sweet or hot Italian sausages (I use the local Isernio brand)
Preheat oven to 400oF. Trim peppers, cut each lengthwise (cut larger bell peppers lengthwise into fourths), remove veins and seeds, and slice each half (or quarter) crosswise into 1″ strips. In 12″ skillet (preferably cast iron), toss peppers thoroughly with olive oil. Place pan in center of oven and roast for 15 minutes. Stir peppers and place whole sausages on top, and continue roasting peppers and sausages for 10 minutes. Remove sausages to cool, and stir peppers and continue roasting for an additional 10 minutes. Meanwhile, slice slightly cooled sausages into ¼” rounds, stir peppers again, put sausages even over the top and roast for a final 10 minutes. Remove pan from oven, stir peppers and sausages together, and remove to serving bowl. Serve warm or at room temperature with crusty toasted Italian or French bread.
Blistered Shishitō Peppers

Blistered Shishitō Peppers
- 1 pint shishitō peppers, rinsed and thoroughly patted dry
- canola oil or light olive oil
- 1 tsp kosher salt
In 12″ skillet over moderately high heat, add oil and heat until almost smoking. Spread peppers evenly over pan, making sure that none overlap. Allow peppers to fry for 2 minutes until they begin to blister and turn brown on the bottom. Stir peppers frequently for an additional 2 minutes. Turn off heat and combine with salt. Remove peppers to serving bowl.
Pork and Chicken Adobo

Yesterday when I arrived in Southern California to visit my wife’s relatives, we were all treated to a classic Filipino dish, adobo, prepared by a family friend, Ronnie E. (His recipe for Bacon Bok Choy follows.) This particular dish, rather than being made with chicken or pork, uses both, a recipe he learned from his mother. I’ve made adobo in the past. As tasty as they were, they were quite vinegary and a tad salty. Ronnie’s is more restrained and balanced, not as garlicky, even if a whole head is called for. The long simmering tames the stinking rose’s harshness, much like roasting garlic. And rather than including vinegar at the beginning, Ronnie finishes the adobo with a small amount.
Pork and Chicken Adobo
- 1 1/2 lbs. bone-in, skinless chicken thighs, cut through the bone in 2″ segments
- 2 lbs. pork shoulder (pork butt), cut into 2″ cubes
- 1 head minced garlic
- 2 bay leaves
- 1/2 to 1 cup soy sauce (depending on saltiness)
- black pepper, to taste
- 1 tbsp. distilled white vinegar
In a large pot, combine chicken, pork, garlic, bay leaves, 1/2 cup of soy sauce and black pepper. Bring to a boil over medium-high heat and reduce to a simmer. Let simmer for 10 minutes, adding more soy sauce to taste. Continue to simmer covered for about an hour until chicken and pork are tender.
Remove pot from heat, add vinegar and stir. Serve with steamed white rice.
Bacon Bok Choy
Bacon tastes good with almost anything. By itself, bok choy is pretty bland, almost grassy in taste. While my wife loves the stuff, I find its sole redeeming feature is its crunchiness when not overcooked. Could the addition of bacon improve things? This recipe, prepared by Ronnie E., a friend of my wife’s family, convinced me that I could make more room for bok choy.
Bacon Bok Choy
- 2 strips of bacon, cut crosswise into 1/2″ slices
- 1/4 of a small onion, cut crosswise into 1/2″ slices
- 1 tbsp. fish sauce
- Ground black pepper
- 5 heads of baby bok choy, cut crosswise into 1″ slices
Over medium heat, fry bacon until almost crispy. Add onions and sauté for 3 minutes until softened. Add pepper to taste and fish sauce, stir to combine, then bok choy. Toss the mixture occasionally until the bok choy is cooked but not overdone, approximately 5 minutes or so. Serve.
Zoomeboshi Tuna Sandwich
I like savory sandwiches, which you’re no doubt thinking is the preference of most people. I say this only because tuna sandwiches are oftentimes too sweet, a result of a heavy hand with relish. Yet, a tuna sandwich without some relish seems one-dimensional. Over the years, I’ve developed a recipe that suits me just fine. It has one surprising ingredient which I borrowed from popcorn enthusiasts. That ingredient is nutritional yeast, whose glutamic acid boosts the salad’s savoriness. I prefer the sandwich open-faced on lightly toasted bread.
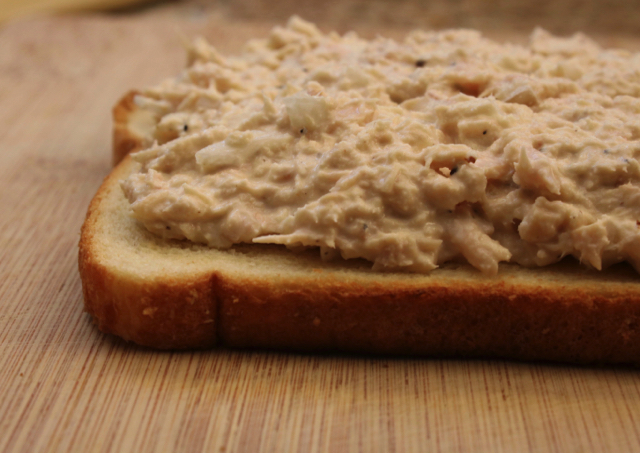
- 1 7.5-oz. canned albacore tuna, drained
2 tbsp. minced onion
1 tsp. sweet relish
1 tsp. nutritional yeast
3 tbsp. mayonnaise, or to taste (I like a creamier consistency)
Salt and freshly ground pepper, to taste
3-4 lightly toasted white bread, cooled
Combine first six ingredients together in a bowl until it reaches the desired consistency. Spread tuna salad on toasts and serve.
Pan-Fried Chicken with Corn & Sun-Dried Tomato Salsa
This is an entrée whose salsa literally upstages the chicken over which it is topped. Originally appearing in Gourmet magazine (which sadly is now no longer in publication), the recipe has Southwestern flavors that are guaranteed to go well with margaritas or beer. While the original recipe called for grilling chicken breasts, here in the Northwest it’s not convenient or conducive to fire up the barbecue, so I’ve adapted it to yield equally tasty results with pan-frying. The salsa is so good that I usually make more. It’s also great to have it with tortilla chips.

2 whole boneless chicken breasts
1 c. frozen sweet corn kernels, thawed
4 tbsp. minced sun-dried tomatoes (preferably without herbs)
4 tbsp. thinly sliced green onions
2 cloves garlic, minced and mashed to a paste with 1/2 tsp. salt
2 tsp. seeded and minced jalapeño chile
2 tbsp. lime juice
3 tsp. white wine vinegar
2 tbsp. olive oil
4 tbsp. minced cilantro
2 whole boneless, skinless chicken breasts
In bowl stir together corn, tomatoes, green onion, red onion, garlic paste, jalapeno, lime juice, vinegar, 2 tbsp oil, cilantro, and salt and pepper to taste.
With hand pressed flatly on top of each breast, slice chicken in half horizontally. Season each chicken slice with salt and black pepper. Heat 12″ skillet over medium-high heat. When pan is hot, add vegetable oil and fry half of the chicken slices, turning chicken over halfway through, until browned on each side, for a total of 2 minutes on each side. Divide chicken and salsa between 4 plates.
Baked Eggs with Bacon and Gruyere
I like savory breakfasts. In general, sweet breakfasts don’t do much for me, which means cereals, pancakes, waffles, sweet rolls and the like don’t excite me very much. Maybe because I’ve never had a sweet tooth. That’s not to say I haven’t had a donut or muffin every now and then; they’re just not my go-to kind of breakfast. Which is why the continental breakfasts now offered by motels and hotels of every stripe elicit a “meh” from me. This recipe is a variation on a bacon and egg breakfast. Gruyere cheese lends a special kind of texture and savoriness.
Baked Eggs with Bacon and Gruyere
Serves 2
3 slices of bacon, cut crosswise into 1/4″ pieces
1/2 cup shredded Gruyere cheese
2 eggs
2 tbsp. half-and-half or heavy cream
Preheat oven to 325° F.
Cook bacon in skillet until crisp. Remove bacon with slotted spoon to paper-towel-lined plate.
Lightly coat two ramekins with vegetable spray. Divide bacon equally between ramekins and top each with half the cheese. Make a well in the center of the bacon-cheese mixture and break an egg into the well. Drizzle cream evenly over the egg and sprinkle egg with salt and pepper to taste.
Place ramekins into pre-heated oven and bake for 10 minutes or so until eggs set to desired doneness. You can jiggle the ramekin to gauge how the egg white is coming along. Remove from oven and place ramekin directly on a heatproof dish and serve immediately.
Tofu with Natto
My kids cringe just at the thought of it. It has a musky, cheesy odor, strong taste and is slimy like you wouldn’t believe. People who have never had it, more often than not, will be repelled by it. Let’s just say that it helps to have grown up with it. Lutefisk, anyone? The Japanese love natto, fermented soy beans. Its health benefits are many. Rich in vitamin K2, it promotes calcium absorption, therefore useful against osteoporosis. Its enzyme nattokinase discourages blood-clotting and thus is beneficial against heart disease and stroke.

This recipe is one way I enjoy natto. Though unnecessary, I stir it up vigorously until very frothy, a common practice in Japan and said to improve its health benefits and boost umami. Stirring should be done with chopsticks to minimize mangling the beans. This YouTube video shows how to do it:
The addition of other ingredients adds savoriness. The removal of excess water from tofu involves compressing it with a plate on top, allowing its weight to gently squeeze moisture out. I buy the Shirakiku brand of mito natto that is the least expensive and contains no MSG (though it’s likely that the MSG is found only in the included sauce packet, which I throw away anyway). Nori tsukudani is a seaweed paste. Shichimi togarashi is a blended seasoning of ground red chile peppers, dried orange peel, and other ingredients. If not available, substitute freshly ground pepper, cayenne pepper or just leave it out. The natto mixture can also be eaten with hot rice.
Tofu with Natto
Serves 2
1 block of tofu (about 14 oz.), excess water removed, then cut horizontally into two slices
2 containers of natto* (about 4 oz.)
1 tbsp. nori tsukudani*
1 tbsp. minced green onion
1 tsp. reduced-sodium soy sauce
Dash of shichimi togarashi* (or substitute ground black pepper or cayenne pepper)
In a small bowl, combine all ingredients and with chopsticks stir continuously and vigorously until very frothy, at least 1 minute. If your natto comes with a small packet of mustard, feel free to add it to the bowl before stirring. Scoop evenly over tofu slices and serve.
* available in well-stocked Japanese grocery stores
Sauteed Yams with Lemon and Garlic Oil
Yams don’t appear frequently enough in recipes. Outside of Thanksgiving, yams are clearly outdone by potatoes. That’s a shame because it’s such a delicious root vegetable. I like garnet yams because of their intense orange-yellow flesh, which means that they’re rich in antioxidants, including beta carotene. This recipe contrasts the yam’s sweet flavor against lemon juice’s tart flavoring, with a dose of garlic tossed in. With the aid of a microwave oven, preparation is really simple, the only problem being the microwave’s tendency to create cracks in the flesh, unlike simple boiling or roasting. It’s best to wrap the yam in a paper towel in the rare event it explodes in the oven. The seasoned salt that I use is a local product made in Port Townsend, Hometown Number 1, a wonderful, clean-tasting blend of coarse salt, paprika, herbs and spices.

Sautéed Yams with Lemon and Garlic Oil
Serves 2
1 large Garnet yam (about ¾ lb.), scrubbed and poked all over with a fork
Olive oil
1 large clove minced garlic
1 lemon
Seasoned salt
Ground black pepper
Combine minced garlic with 2 tablespoons of olive oil. Set aside. Wrap yam in paper towel, place on a microwave-proof dish, and microwave on high for about 5-6 minutes, or until toothpick easily pierces the flesh. Turn over halfway once during the cooking time. Set yam aside for 5 minutes or so, until yam is cool enough to handle. Heat 1 tablespoon olive oil in a 10-inch skillet until hot. Meanwhile, slice yam into 3/4-inch-thick slices, discarding the ends, and fry in the skillet, about 2 minutes per side until lightly browned. Remove from skillet to a serving dish, sprinkle with salt and pepper to taste, squeeze lemon juice over the slices, then pour garlic oil on top. Serve.
Roasted Zucchini
This recipe is a terrific way to use a large amount of zucchini. It is best served at room temperature and goes quite well with any Italian dish or grilled meat or fish. Salting will remove excess moisture from the zucchini. I don’t bother to rinse the salt off with water. Just blotting well with paper towels will ensure that the zucchini remains well seasoned.

Roasted Zucchini
Serves 2
6 medium size zucchini, sliced lengthwise, then cut crosswise into 1/4-inch-thick half-moons
Olive oil
3/4 tsp. kosher salt
1 large minced clove of garlic
Ground black pepper
Preheat oven to 400° F. Sprinkle zucchini with salt in a colander, toss well with hands and let drain for 20 minutes. Wipe zucchini thoroughly with paper towels until dry, transfer to large roasting pan, then toss with 2 tbsp. olive oil. Spread zucchini slices in bottom of roasting pan, making sure one of the cut sides are facing down. Roast zucchini for 20-25 minutes or until cut-sides are richly browned. (Only one side needs to be browned.) Remove roasting pan from oven, sprinkle minced garlic and pepper on top, and with spatula, carefully scrape zucchini from the bottom of the pan a few times, using a flipping motion to incorporate garlic thoroughly. The hot roasting pan will cook the garlic. Remove zucchini to a plate and let cool to room temperature before serving.
Cuban Picadillo
Originally appearing in the Los Angeles Times many years ago, this recipe has been a family favorite for many years. Unlike most recipes for Cuban picadillo, it doesn’t use raisins or herbs. The ground beef should not be too lean, otherwise the cooked meat turns pebbly and chewy. Simmering in some fat will keep the beef tender. Soy sauce, another non-traditional ingredient, boosts umami.

Cuban Picadillo
Serves 4
1½ lb. 85%-lean ground beef
1-2 cloves minced garlic
l minced onion (about 1½ cups)
1 14.5-oz. can of diced tomatoes (preferably not with tomato juice added), gently drained in a colander set over a bowl, juice reserved
1 minced green bell pepper
2 tsp. soy sauce
1-2 tbsp. capers, drained
12 green olives with pimientos, sliced
for garnish, minced cilantro
Cook beef, onion and garlic in large skillet until meat loses its red color, breaking up meat as it cooks. Add tomatoes, green bell pepper, soy sauce, and salt and pepper to taste to meat mixture. Cook uncovered, stirring now and then, until most of liquid has evaporated, about 20 minutes, adding additional tablespoons of reserved juice if the mixture is too dry. Stir in olives and capers, and cook 10 minutes longer. Garnish with cilantro.
Pan-Fried Fish Fillets with Cucumber Relish
White fish generally calls for light seasoning or saucing to let the subtle flavor shine through. Not so with this one. What’s intriguing about this recipe is the bold combination of vinegar, garlic, fish sauce (nuoc mam), jalapeño chile, and green onions, a salsa combined with the refreshing taste of cucumber. This Abby Mandell recipe originally appeared in Bon Appetit magazine back in the 80s. As you may know, Ms. Mandell was a big promoter of the food processor, which makes short work of the relish. If you want a less sweet version, use the lite version of the vinegar. The relish is so good that you will want to spoon even more on the fish. Leftover sauce is also great on many other foods. For the fish, I generally use sole, though any mild-tasting white fish will do. To make coating the fish easier, I shake them in a plastic produce bag with the flour mixture.
Pan-Fried Fish Fillets with Cucumber Relish
Serves 6
2 large cloves garlic
1 small stemmed jalapeño chile
1/2 large, peeled, seeded and cut into 1″ lengths, cucumber
6 large, trimmed and cut into 1″ lengths, green onions
1/2 cup + 2 tbsp seasoned rice vinegar (regular or lite)
2 tbsp nuoc mam
2 tbsp vegetable oil
large pinch of salt
1/3 cup flour
3/4 tsp ground cumin
1/4 tsp ground turmeric
3 tbsp minced cilantro
1 lb mild white fish fillet, dried with paper towels
In a food processor, drop garlic and jalapeño through feed tube and process until minced. Scrape down sides of work bowl. Add cucumber and green onions and chop using on/off turns, until cucumber is finely chopped. Transfer contents of work bowl to small bowl. Mix in vinegar, fish sauce, 2 tbsp oil, large pinch of salt. Let stand at room temperature for 1 hour. Drain liquid.
Combine flour, cumin, salt, turmeric and cilantro in a plastic produce bag and shake to combine well, add fish and shake again to coat them with the flour mixture.
Heat 3 tbsp oil in heavy large skillet over medium-high heat. Add fish and sauté until cooked through and edges are brown, about 2 minutes per side. Transfer fish to paper towels to drain briefly. Arrange fish on platter. Spoon relish atop. Alternatively, serve the fish and sauce separately.
Beef with Saifun Noodle Soup
I love this savory and spicy soup, the origin of which is now lost. I’ve been making it for decades. It’s great for breakfast, too. If there is a butcher who can slice the meat into sukiyaki-thin slices, it will make cutting the meat much easier. Just stack and slice. If the butcher can’t do this, freeze the beef until somewhat firm to make slicing the meat into matchsticks less of a chore. It is advisable that the beef be no thicker than 1/8″, otherwise it will become somewhat chewy after cooking. Chinese fermented black beans are available in any well-stocked Asian grocery store, but for convenience I like to use the jarred version packed in oil (Master brand in a yellow and red bottle, made in Taiwan). If the beans are already combined with garlic (most brands are), you can adjust the amount of fresh garlic accordingly, but while perfectly acceptable, these kinds of jarred beans don’t have the purity of flavor as using straight beans and fresh garlic separately. Like any noodles in broth, they will absorb the liquid the longer they sit.
Beef with Saifun Noodle Soup
Serves 4
2 tsp. cornstarch
2 tsp. dry sherry or Chinese Shaoxing wine
2 tsp. vegetable oil
2 tbsp. vegetable oil
2 tbsp. Chinese fermented black beans, slightly mashed with a fork
3-6 small dried red chiles (depending on heat preference)
1 tbsp. minced garlic
6 cups low-sodium chicken broth
1 tbsp. soy sauce
1 ½ tsp. sugar
4 oz. saifun, soaked in warm water for 15 minutes and cut into 6″ lengths
¾ lb. beef sirloin or top round, cut into matchstick strips across the grain
3 green onions, cut into 2″ lengths
1 tsp. Asian sesame oil
Combine cornstarch, sherry and 2 tsp oil and mix with meat. Pour 2 tbsp oil into a Dutch oven over high heat. Add black beans, peppers, and garlic. Cook, stirring, until peppers begin to brown, about 1-2 minutes. Add broth, soy sauce, sugar, and saifun. Bring to boil, then stir in meat and green onions. Cook, stirring occasionally, until meat loses its pinkness, about 3 minutes. Stir in sesame oil.
Zoomeboshi Fried Rice
Fried rice is one of my favorite breakfast dishes. One of the reasons I like this version is that it contains both bacon and eggs. I’ve been making this recipe, developed over a period of years, for quite some time. The most important ingredient is the rice, which must be more than a day-old, preferably three days or more. I use Japanese short-grain rice. As steamed rice sits longer in the refrigerator, it loses more of its moisture and becomes somewhat dry and hard, a quality perfect for fried rice. As the rice cooks over the stove, it softens by picking up moisture from the vegetables and sauces. The goal is not to overcook the rice to the point it becomes too mushy, which is one reason sufficient fat (from the bacon, for example) acts as a moisture barrier. Generally, I don’t like to cook with nonstick pans because high heat releases polytetrafluoroethylene (PFTE) fumes, likely a health hazard for humans and definitely fatal to canaries. Cooking fried rice is one exception, since rice tends to stick tenaciously to conventional pan surfaces. Low to medium heat is called for. An important note is that, once the rice is added, tossing should be done quickly. Too much time spent in the pan will produce gummy results. Though not called for below, occasionally I’ll add some diced spam with the onions and corn. We enjoy this rice with fukujinzuke and nori tsukudani.

Zoomeboshi Fried Rice
Serves 3
3 slices of thick-cut smoked bacon, cut into 1/4-in-wide pieces
About 3 cups of at least two-day old refrigerated cooked Japanese rice
1/2 cup onion, diced
1/4 cup frozen corn
1 tsp. oyster sauce
1 tbsp. reduced-sodium soy sauce
1 cup (or more) baby arugula or spinach
1/4 cup sliced green onion
1 large egg
Vegetable oil as needed
In a small bowl, combine well the oyster and soy sauces. Set aside.
Separate grains of rice by hand, making sure not to leave large clumps. Small clumps of about 1/4″-around are fine.
Cook bacon in nonstick pan over medium-low heat until crisp (this could take 10 minutes or so on this heat setting). Remove bacon to a plate with a slotted spoon.
In the rendered bacon fat, cook onions and corn over medium-low heat, until vegetables begin to brown, about 5 minutes. Add rice and with wooden spoons quickly toss until grains are evenly coated with fat, for a minute or two. Add additional vegetable oil if the rice doesn’t “shine” with oil, no more than a teaspoon or so. Quickly add oyster sauce-soy sauce mixture, arugula or spinach, salt and freshly ground pepper to taste, and toss thoroughly until rice has an almost uniform color.
Push rice to the outer edge of the pan, creating a hole in the center. Break the egg into the center of the pan, puncture the yolk with a wooden spoon, stir egg slightly and let cook, undisturbed, until almost set. Break up the egg into smaller pieces with a wooden spoon. Turn off heat, add reserved bacon and green onions and toss rice mixture until thoroughly combined. Serve.
Blueberry-Coconut-Macadamia Nut Muffins
Despite the fact that I am not a sweet-breakfast person, every so often I do enjoy a good muffin. Eating Well magazine originally published this recipe several years ago, to which I’ve made one change, substituting coconut for canola oil. Aside from its very coconut-intensive flavor, what I like about it is its relative healthfulness, to the extent that any recipe calling for refined flour and sugar is “healthy.” Macadamia nuts add a tropical twist.
Blueberry-Coconut-Macadamia Nut Muffins
Makes 12 muffins
1⁄4 c. unsweetened shredded coconut
2 tbsp. + 3/4 cup divided unbleached white flour
2 tbsp. + 1/2 cup divided brown sugar
5 tbsp. chopped, divided raw macadamia nut
2 tbsp. divided melted coconut oil
1 c. whole-wheat flour
1 tsp. baking powder
1⁄4 tsp. baking soda
1⁄8 tsp. salt
1⁄2 tsp. ground cinnamon
1 large egg
1 large white of egg
3⁄4 c. low-fat buttermilk
2 tbsp. melted unsalted butter
1⁄2 tsp. coconut (or vanilla) extract
1 1⁄2 c. blueberry, fresh or frozen
Preheat oven to 400°F.
Coat a 12-cup muffin pan with cooking spray. Combine coconut, 2 tablespoons all-purpose flour, 2 tablespoons brown sugar and 2 tablespoons macadamia nuts in a small bowl. Drizzle with 1 tablespoon coconut oil; stir to combine. Set aside.
Whisk the remaining 3⁄4 cup all-purpose flour, whole-wheat flour, baking powder, baking soda, salt and cinnamon in a medium bowl. Whisk the remaining 1⁄2 cup brown sugar, the remaining 1 tablespoon coconut oil, egg, egg white, buttermilk, butter and coconut (or vanilla) extract in a medium bowl until well combined. Make a well in the center of the dry ingredients and pour in the wet ingredients; stir until just combined. Add blueberries and the remaining 3 tablespoons nuts; stir just to combine. Divide the batter among the prepared muffin cups. Sprinkle with the reserved coconut topping and gently press into the batter.
Bake the muffins until golden brown and a wooden skewer inserted in the center comes out clean, about 20 minutes. Let cool in the pan for 10 minutes, then remove from the pan and let cool on a wire rack at least 5 minutes more before serving.
Cheese Egg Puffs
This recipe for cheese puffs has been a family favorite for many years. It has become a tradition to serve it on Christmas morning, though there is nothing about it that is particularly suggestive of the holiday. We used to bake it for our kids when they were little. Now that one of them has children of her own, she makes it on Christmas, too, no doubt continuing the tradition for at least another generation. The recipe originally appeared in one of Sunset magazine’s paperbound cookbooks. The final step before spooning the batter onto baking sheets requires a lot of arm endurance, but I’ve discovered that using a food processor makes short work of making it. If done correctly, the puffs will swell and keep their domed shape. The puffs are especially good with jam.

Cheese Egg Puffs
Makes 4 puffs
1⁄2 c. milk
2 tbsp. butter
1⁄4 tsp. salt
dash of black pepper
1⁄2 c. flour
2 egg
1⁄3 c. shredded sharp cheddar cheese
for topping, additional shredded sharp cheddar cheese
kosher salt
In a 1 1⁄2-quart pan, combine milk, butter, salt, and pepper. Bring to full boil over medium heat. Add flour all at once and stir until mixture leaves sides of pan and forms a ball. Remove from heat and beat in eggs, one at a time, until mixture is smooth and well blended. Beat in 1⁄3 cup of shredded cheese.
Alternatively, place the ball in the work bowl of a food processor, add one egg and blend until smooth. Repeat with remaining two eggs until thoroughly blended. Add 1/3 cup of shredded cheese and pulse 3-4 times until combined.
Using 2 large spoons, make 4 equal mounds of dough, and place 2 inches apart on greased baking sheet. Sprinkle remaining cheese and kosher salt evenly over mounds. Bake in 375° F oven for 30 to 35 minutes or until puffs are well browned and crisp. Serve hot.

Starting to cook again. Will try some of the recipes. Market here in Olympia open for a while.Bravo
to your presentation.
LikeLike